Friday, September 8, 2017

6mm ACW Buildings by Leven Miniatures from The Wargaming Company

I was browsing The Wargaming Company's website last weekend after reading something on TMP about them.  They have an extensive Napoleonic wargame scenario series that has painting guides and the whole works.  It's great eye candy but a little more than I need.

I looked through their other products and found these awesome ACW 6mm buildings.  They have a whole series of recognizable battlefield features from Shiloh Church to the Trostle Farm.  Their Naploenic range includes Plancenoit Church and all of the standard Waterloo buidlings.


This is the 6mm version of the McPherson Barn at Gettysburg with a stand of Adler 6mm rebs for scale.  These are beautiful and solid resin sculpts.  You can see every brick and board.  I can't wait to paint these. 

Just incredible.

Dunker Church

You can find these at :
The Wargaming Company

Monday, September 4, 2017

Brew Day

The holiday weekend was a great time to get in a all grain brew in a bag batch of beer.  I'm trying a clone batch of Fuller's ESB.  Also trying a one gallon small batch for the first time.  Everything seemed to go well.  We'll see in a bit if I was successful.  This process was so easy and low maintenance I love it.  I'm looking forward to seeing the results of this batch and planning another.

I'll add more details of the recipe later.

It was a little difficult getting the small quantities of hops measured correctly. I will have to explore some other ideas on this before next time.

The bag was really easy to work with.  None of my fears were realized about it burning on the bottom of the brew kettle or being too hot or difficult to move.  It was really slick to use. 

The boil...
Cooling the old fashioned way.
The final product.


Russian armor next on the paint bench

Skipping ahead to WW2.  I'm priming a whole batch of Heroics and Ros micro armor I got on clearance at The Last Square.  I hope to get this done pretty quickly and in the process decide what 3mm Pico project to start next.  

Sunday, September 3, 2017

The Russians Are Here ....

Fresh off the pain desk.  I'll add some shots with terrain later.  These had a weird glow.

Infantry with command all formed up. 
Artillery present
Heavy cavalry Division.  Dragoons in the front, Cuirassiers in the rear.

Light cavalry.  Cossacks on the right.  

Army and Brigade commanders.

Monday, August 28, 2017

The Russians Are "Still" Coming .....

Update on my progress of getting a 3mm Pico Russian force into the field.  Several components on the painting table this week in various stages of work.

The bulk of the Russian cavalry is ready to go, both heavies and lights. 
A little flock and these will all be ready for action.

I decided to add three regiments of Cossacks to help round out the Cavalry force.  I'm doing one as Ukrainian, one Don, and one mixed group.   Should look good and help to flesh out some scenarios.  I also primed 2 regiments of Jaegers which I need to complete the Division.

Tying to sort out a few command stands.  I decided I needed to paint a few more mounted aides to make the right quantity.  Some of my mounted commanders went to infantry stands and I came up a little short.

I still need to paint all of the infantry flags.  Saved them for last.  I'm going to use the 29th Division at Borodino as the model for these.

Sunday, August 20, 2017

The Russians Are Coming .....

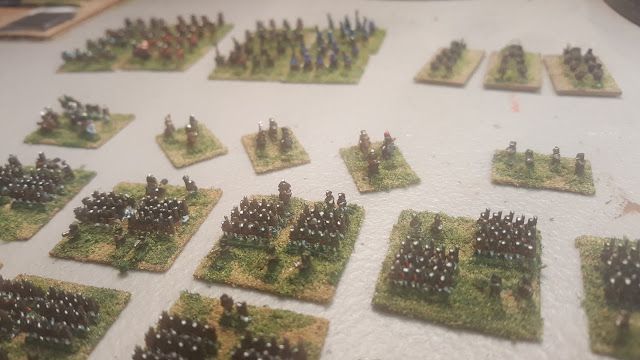
3mm Pico Russian force is on the painting table headed for basing.  This group will soon help out the Austrians in the 1809 Campaign and open up more scenarios for the French in the later years.
Russian Artillery and train

Light Cavalry Division of several Hussar Regiments.
Heavy Cavalry Division in the back made of Dragoons and Cuirassiers.

Russian Infantry
I'll post some pics when these are based.  I also just primed three regiments of Cossacks to add to the force.

Friday, June 30, 2017

Hanau, Germany October 30, 1813 - Corps In Conflict, 3mm Pico Armor Napoleonics

Got ready for the long 4th of July weekend by getting together with Mark, Joe, and Mike at TableTop Game Cafe to play a new 3mm Napoleonic scenario.  Mark supplied a new French force mostly of Guard units who were once again pitted against their old adversary, Mark's Austrians.  Below is the scenario briefing.

Napoleon chose Leipzig to confront the coalition of Austria, Russia, Prussia, and Sweden, but Napoleon's defeat forced a retreat back towards Mainz (on the Rhine River) and safety. At Hanau the Allies attempted to block the retreat of a disorganized French army. Bavarian General Wrede made sensible dispositions in-line with his intention to remain on the defensive. Wrede's relatively strong left covered the road to Mainz along which the French were retreating. Otherwise the coalition cavalry was placed behind the center in reserve supporting an evenly dispersed line of infantry and artillery throughout the intended battlefield across which Napoleon’s army would retreat.

Napoleon received detailed intelligence about Wrede’s preparations and set his army in motion accordingly. Napoleon surmised the Coalitions’ position and spotted its main weakness, namely that most of their army deployed with the river behind it, with some streams interrupting east-west movement. Upon seeing Wrede's dispositions, Napoleon sarcastically noted: "I have made Wrede a Count but it’s beyond my power to make him a General." In order to exploit this potentially fatal weakness in Wrede's deployment, Napoleon tapped his Guard infantry and Imperial Guard cavalry whose battalions were still relatively intact after Leipzig. The French plan was simple, attack the Coalition left, seal-off their position and outflank them in such a way as to get the retreating column across and ahead of the Coalition, then fight a rearguard action all the way to Mainz.


The initial setup

French Guard Forming up

Initial Set up from behind the French left looking toward the Kinzig River.

Hanau Order of Battle

Austrian III Corps (31 stands)

FML Fresnet-set-up in Zone 2              E                 5                  +2
GD Bach                                   R                 5                  +1
12# battery (6 guns)                      R                 12                 +0
GB Trautenberg                            R                 5                  +1
Grenadiers                   3x           E                 6                  +2
6# battery (4 guns)          2x           R                 6                  +0                   
GB Hardegg-set-up in Zone 1               R                 4                  +1
3rd Jagers                                E                 7                  +1
1 st Sleker Line             2x           R                 8                  +0
6# battery (4 guns)                       R                 6                  +0
GB Wolkmannt-set-up in Zone 2             R                 4                  +1
Archduke Rudolph Line        4x           E                 7                  +1
Jordis Line                  4x           R                 7                  +0
6# battery (6 guns)                       R                 9                  +0
GC Spleny -set-up in Zone 3               R                 5                  +1
Archduke Joseph Hussars w/ Brigadier      E                 7                  +2
Hussars                      2x           R                 6                  +0
Uhlans w/ Brigadier                       E                 7                  +3
Liechtenstein Cuirassiers                 E                 6                  +2
Dragoons                                  R                 6                  +0
  
French IV Corps (24 stands)

Napoleon                                  E                 5                  +3
GB Curial                                 E                 4                  +1
Grenadiers Old Guard                      E                 8                  +2
Chassuers Old Guard           2x          E                 7                  +1
Italian Line (Turin/Florence) 2x          R                 7                  +0
12# battery (6 guns)                      R                 12                 +0  
GC Nansouty                               E                 5                  +1
GD Desnouettes                            E                 4                  +1
Polish Lancers-Guard w/ Brigadier         E                 6                  +3
Carabiniers Young Guard w/ Brigadier      E                 6                  +3
Berg Lancers                              R                 5                  +1
Imperial Guard Lancers        2x          E                 6                  +2
6# Horse battery (6 guns)                 R                 9                  +0
GD Walther                                E                 5                  +2
Chassuers-Imperial Guard w/ Brigadier     E                 6                  +2
Polish Lancers-Guard w/ Brigadier         E                 6                  +3
Dutch Honor Guard Lancers     2x          I                 6                  +0
Dragoon Guard Lancers w/ Brigadier        E                 5                  +3
6# Horse battery (6 guns)                 R                 9                  +0

After Action Report:

Opening Phase of the Battle:

The Austrians made a crucial decision to deploy their center on the enemy side of the Kinzig river.  That would have a significant impact on the outcome of the day.  They posted a large cavalry force in the open ground on their left and anchored their right on the southern most bridge crossing the Kinzig.

The French plan was to assault the nearest bridge on their left with the bulk of their infantry.  An artillery grand battery was posted in their center with a large, but already weakened, cavalry force to screen it and protect their right.


Progress mid way through the day:

The Austrians right slowly gave ground to the French assault.  The Austrian center was immediately attacked by a large French cavalry force but was able to form square and hold off repeated French attacks.  This stubborn resistance lasted for 3-4 turns.  The French were unable to make a dent in the Austrian Center to put additional pressure on their right. On the Austrian left their cavalry became engaged to relive the pressure of the French artillery and the cavalry action.  An inferior French light cavalry brigade was hard pressed from the start.

The French assault on the Austrian right was a slogging match to reach the bridge.  The artillery in the French center was able to do significant damage to the Austrian center but not enough to dislodge any formations to allow the cavalry assault to break through.  The French right was slowly being ground down and the artillery in the center would be exposed in a few turns.  


Closing Phase of the Battle:

The Austrian center held the enemy the entire day.  Their cavalry became masters of the French right, but it was clear the bridge would be taken with the Emperor himself making an appearance to encourage the troops.  The overall engagement gave the impression of the lines rotating about 90 degrees with the French eventually making it across the river which would ultimately satisfy the victory conditions, but with a high cost.


The Corps In Conflict Scenario